I’ve been playing with Rust for a while now. With a few thousands lines of Rust code under my belt I can’t by any means claim to be an expert, but I’ve formed a few opinions on it. I mostly like its syntax very much. It’s refreshing compared to many other languages out there. I also consider Rust a complex language. While I can easily develop code in Java, which is what I’m currently doing, without having ever written a line of code in it, Rust is different. Just like with your first book on C or C++, you have to actually learn Rust.
So why did I start looking into Rust? Well, in the beginning it was just curiosity and wanting to learn something new and I had to choose between Go and Rust. I first looked into Go, took the official language tour and had understood its syntax in about 1-2 hours. That, of course, doesn’t mean I mastered it, but I was ready to program something in it. And that’s also the key strength of Go: you can learn programming in it right away, it’s extremely simple.
Then I started studying Rust and after half a day spent on a train reading parts of the Rust book, I ported a small CHIP-8 emulator to it in one day. Just a small exercise to become more familiar with the language. Throughout the following month I continued reading the Rust book and even re-reading chapters, in order not to forget things. It is necessary to use a language in order to remember it: this is true both for programming languages as for spoken ones. And the more complex a language is, the easier it is to forget it and Rust has a learning curve which is steeper than Go or C#.
I would say that a C++ developer can easily program in any C-dialect (Java, C#, Go, JS, etc.) and can easily learn languages such as Python or Ruby. Rust is a paradigm shift and takes longer to learn.
About two months ago, I had to start the development of a command-line project and needed a decent standard library. The end-result had to be a native, statically linked executable. Realistically, the possibilities were: C/C++, Rust or Go. For C++ the STL was out of question, because I think it’s terrible and anyway lacks many features which are essential. Qt is a beautiful C++ library and I use it gladly whenever I can, but static linking would require a commercial Qt license. On top of that, compiling on multiple OSs would require a rebuild of the static Qt library on each OS, so a lot of extra work.
But apart from all this, there was also the fact that the project in question was boring to develop and I wanted it to be fun. So while I briefly considered Go, I went almost immediately with Rust. Go is not just simple, it’s simplified. It lacks many important constructs present in other languages for the purpose of simplicity. While the simplicity of Go can be refreshing and has its charm, I found myself naturally gravitating towards the complexity of Rust.
To be clear, I don’t like unnecessary complexity and that’s why I am not using most of the new features to be found in C++. Complexity has to be kept simple. Rust set a number of goals for itself and some of them are complex to solve without a garbage collector. Within the complexity which arises from these goals, it needs to keep things as simple as possible.
Having said all that, Rust is not yet a mature language in many ways and can’t be used for just any project like C/C++. Its library is less rich than that of Go, some its standard library does have, in my opinion, an odd syntax and compiling can be really slow.
What I wrote in the CHIP-8 post was:
I can’t yet write something exhaustive about Rust, because I’m still learning it. What I can say up until now is that, apart some minor things which I dislike (snake-case: ugh), it seems fun to program in it. The amount of rules make the programming a bit more challenging, but it pays off in satisfaction once everything builds without complaints.
The only thing I can say is that I can’t clearly see a use-case for Rust. Yes, it’s a solid and secure language which is fun to use. But will it be used in the real world? I can see many use-cases for Go, not so many for Rust. What I hope is for Rust to mature some more and then to become stable, without going down the path to insanity like modern C++.
I must say I changed my mind. I definitely see a future for Rust, because if there are enough talented programmers who think it’s fun to program in it, it will grow. That’s a safe bet. The only thing it must avoid is to have people implementing useless features in it, the way it is being done in C++, just for their academic score. But before that happens Rust will definitely flourish.
One of the aspects about Rust in connection to closed-source projects which needs to be mentioned is that there’s a lot of debug information inside of a Rust executable, even in release mode. Every panic! in Rust prints out a lot of metadata.
Let’s take for instance this small sample I created:
fn foo() {
	panic!("this is an error");
}

fn main() {
    println!("Hello, world!");
	foo();
}
It will print out:
Hello, world!
thread 'main' panicked at 'this is an error', src\main.rs:2:2
note: Run with 'RUST_BACKTRACE=1' environment variable to display a backtrace.
By setting RUST_BACKTRACE to 1, it’s even worse:
Hello, world!
thread 'main' panicked at 'this is an error', src\main.rs:2:2
stack backtrace:
   0: std::sys_common::backtrace::print
             at /rustc/2aa4c46cfdd726e97360c2734835aa3515e8c858\/src\libstd\sys_common\backtrace.rs:58
   1: std::panicking::default_hook::{{closure}}
             at /rustc/2aa4c46cfdd726e97360c2734835aa3515e8c858\/src\libstd\panicking.rs:200
   2: std::panicking::default_hook
             at /rustc/2aa4c46cfdd726e97360c2734835aa3515e8c858\/src\libstd\panicking.rs:215
   3: std::panicking::rust_panic_with_hook
             at /rustc/2aa4c46cfdd726e97360c2734835aa3515e8c858\/src\libstd\panicking.rs:478
   4: std::panicking::begin_panic
   5: std::panicking::try
             at /rustc/2aa4c46cfdd726e97360c2734835aa3515e8c858\/src\libstd\panicking.rs:276
   6: std::panic::catch_unwind
             at /rustc/2aa4c46cfdd726e97360c2734835aa3515e8c858\/src\libstd\panic.rs:388
   7: std::rt::lang_start_internal
             at /rustc/2aa4c46cfdd726e97360c2734835aa3515e8c858\/src\libstd\rt.r
s:48
   8: main
   9: BaseThreadInitThunk
  10: RtlInitializeExceptionChain
  11: RtlInitializeExceptionChain
I found these privacy issues related to closed-source projects being mentioned in this thread on GitHub, but I didn’t find any ready-to-use solution.
So the obvious and only solution is to modify the Rust compiler and that’s exactly what we’re going to do. While I’m describing how to do this on Windows, the parts not related to the build process are valid on Unix as well.
I’d like to mention that, in order to avoid this hassle, I briefly looked into Go to check how much metadata was to be found in Go binaries. The answer is: a lot. And it’s even way worse than in Rust, because Go has reflection and patching that out of the compiler is way more difficult and may break lots of stuff.
Another reason worth mentioning why Go was a no-go is that at least on Windows the capability of Go to call C-code via CGo requires the mingw compiler and that leads to a whole new set of problems.
The first step to build the Rust compiler is to download the source. You can do so either from the website or from GitHub. Then you need Visual Studio 2017 or above. The README says 2013 or above but I found another part of the documentation mentioning 2017 or above and I had difficulties building with Visual Studio 2013. The community edition of Visual Studio is more than enough. I used Visual Studio 2017.
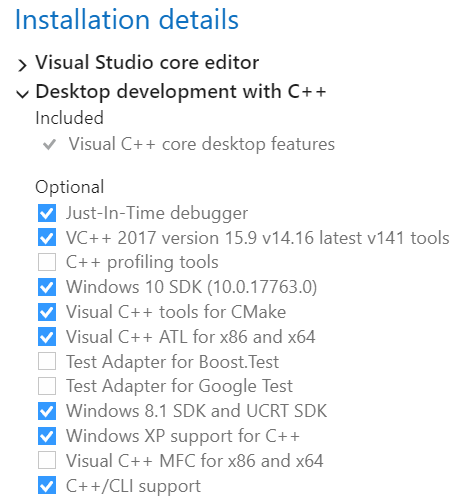
Extremely important, however, are the packages of Visual Studio you need to install. Initially, since I didn’t think I needed many, I limited myself to the essential and got strange build errors. It took me a _lot_ of time to understand that I needed to install certain additional packages in Visual Studio. If you’re the kind of guy who just installs everything which comes with Visual Studio, then you’re good to go. But if you’re more like me and want to limit the installation size, here’s the essential packages you absolutely need to install in order not to anger the gods:
Build instructions can be found in the README. The relevant part for us is:
#### MSVC
[windows-msvc]: #windows-msvc

MSVC builds of Rust additionally require an installation of Visual Studio 2013
(or later) so `rustc` can use its linker. Make sure to check the “C++ tools”
option.

With these dependencies installed, you can build the compiler in a `cmd.exe`
shell with:

```sh
> python x.py build
```

Currently, building Rust only works with some known versions of Visual Studio. If
you have a more recent version installed the build system doesn't understand
then you may need to force rustbuild to use an older version. This can be done
by manually calling the appropriate vcvars file before running the bootstrap.

```batch
> CALL "C:\Program Files (x86)\Microsoft Visual Studio 14.0\VC\bin\amd64\vcvars64.bat"
> python x.py build
```

#### Specifying an ABI
[specifying-an-abi]: #specifying-an-abi

Each specific ABI can also be used from either environment (for example, using
the GNU ABI in PowerShell) by using an explicit build triple. The available
Windows build triples are:
- GNU ABI (using GCC)
    - `i686-pc-windows-gnu`
    - `x86_64-pc-windows-gnu`
- The MSVC ABI
    - `i686-pc-windows-msvc`
    - `x86_64-pc-windows-msvc`

The build triple can be specified by either specifying `--build=` when
invoking `x.py` commands, or by copying the `config.toml` file (as described
in Building From Source), and modifying the `build` option under the `[build]`
section.
The build triple I used is ‘i686-pc-windows-msvc’, because I needed the application to be 32-bit, in order to maximize compatibility. What I did is to copy the ‘config.toml.example’ in the main directory to ‘config.toml’ and modify parts of it.
The following are the parts I modified:
[llvm]

# Indicates whether the LLVM build is a Release or Debug build
optimize = true

# Indicates whether an LLVM Release build should include debug info
release-debuginfo = false

# Indicates whether the LLVM assertions are enabled or not
assertions = false

# Link libstdc++ statically into the librustc_llvm instead of relying on a
# dynamic version to be available.
static-libstdcpp = true

# LLVM targets to build support for.
# Note: this is NOT related to Rust compilation targets. However, as Rust is
# dependent on LLVM for code generation, turning targets off here WILL lead to
# the resulting rustc being unable to compile for the disabled architectures.
# Also worth pointing out is that, in case support for new targets are added to
# LLVM, enabling them here doesn't mean Rust is automatically gaining said
# support. You'll need to write a target specification at least, and most
# likely, teach rustc about the C ABI of the target. Get in touch with the
# Rust team and file an issue if you need assistance in porting!
targets = "X86"

# When invoking `llvm-config` this configures whether the `--shared` argument is
# passed to prefer linking to shared libraries.
link-shared = false

# Build triple for the original snapshot compiler. This must be a compiler that
# nightlies are already produced for. The current platform must be able to run
# binaries of this build triple and the nightly will be used to bootstrap the
# first compiler.
build = "i686-pc-windows-msvc"    # defaults to your host platform

# Flag to specify whether any documentation is built. If false, rustdoc and
# friends will still be compiled but they will not be used to generate any
# documentation.
docs = false

# Indicates whether the native libraries linked into Cargo will be statically
# linked or not.
cargo-native-static = true

[rust]

# Whether or not to optimize the compiler and standard library.
#
# Note: the slowness of the non optimized compiler compiling itself usually
#       outweighs the time gains in not doing optimizations, therefore a
#       full bootstrap takes much more time with `optimize` set to false.
optimize = true

# [...]
debug = false

# Whether or not debug assertions are enabled for the compiler and standard
# library.
debug-assertions = false

# Whether or not `panic!`s generate backtraces (RUST_BACKTRACE)
backtrace = false

[target.i686-pc-windows-msvc]

# Force static or dynamic linkage of the standard library for this target. If
# this target is a host for rustc, this will also affect the linkage of the
# compiler itself. This is useful for building rustc on targets that normally
# only use static libraries. If unset, the target's default linkage is used.
crt-static = true
rustc is a bootstrapping compiler, which means that it uses itself to build itself. There are 3 build stages called stage0, stage1 and stage2. Only at stage1 the sources in our directory are used. The resulting compiler then builds itself again in stage2. This process is described in detail on this page.
Finding the panic! macro is very easy: it’s inside src/libcore/macros.rs.
#[macro_export]
#[allow_internal_unstable(core_panic, __rust_unstable_column)]
#[stable(feature = "core", since = "1.6.0")]
macro_rules! panic {
    () => (
        panic!("explicit panic")
    );
    ($msg:expr) => ({
        $crate::panicking::panic(&($msg, file!(), line!(), __rust_unstable_column!()))
    });
    ($msg:expr,) => (
        panic!($msg)
    );
    ($fmt:expr, $($arg:tt)+) => ({
        $crate::panicking::panic_fmt(format_args!($fmt, $($arg)*),
                                     &(file!(), line!(), __rust_unstable_column!()))
    });
}
While the first instinct would be to patch this macro, if we look at what is called inside of it, we can see it calls the macros file!, line! and __rust_unstable_column!. These macros are defined in the same file:
    #[stable(feature = "rust1", since = "1.0.0")]
    #[rustc_doc_only_macro]
    macro_rules! line { () => ({ /* compiler built-in */ }) }

    /// Expands to the column number on which it was invoked.
    ///
    /// For more information, see the documentation for [`std::column!`].
    ///
    /// [`std::column!`]: ../std/macro.column.html
    #[stable(feature = "rust1", since = "1.0.0")]
    #[rustc_doc_only_macro]
    macro_rules! column { () => ({ /* compiler built-in */ }) }

    /// Expands to the file name from which it was invoked.
    ///
    /// For more information, see the documentation for [`std::file!`].
    ///
    /// [`std::file!`]: ../std/macro.file.html
    #[stable(feature = "rust1", since = "1.0.0")]
    #[rustc_doc_only_macro]
    macro_rules! file { () => ({ /* compiler built-in */ }) }
Unfortunately, they are built-in. However, patching out these macros is much better than modifying the panic! macro, as it solves the issue at its roots and prevents these macros from generating metadata elsewhere.
So I searched for the “column” word in the whole source tree and after a bit of inspection finally got to the location where built-in macros are expanded, which is in src/libsyntax/ext/source_util.rs.
So I patched out the relevant parts:
use syntax_pos::{self, Pos, Span, FileName};

// becomes

use syntax_pos::{self, Span, FileName};

// note: this is important because Rust doesn't tolerate unused imports and after these
//       changes the 'Pos' import is no longer used

/// line!(): expands to the current line number
pub fn expand_line(cx: &mut ExtCtxt<'_>, sp: Span, tts: &[tokenstream::TokenTree])
                   -> Box {
    base::check_zero_tts(cx, sp, tts, "line!");

    let topmost = cx.expansion_cause().unwrap_or(sp);
    let loc = cx.source_map().lookup_char_pos(topmost.lo());

    base::MacEager::expr(cx.expr_u32(topmost, loc.line as u32))
}

// becomes

/// line!(): expands to the current line number
pub fn expand_line(cx: &mut ExtCtxt<'_>, sp: Span, tts: &[tokenstream::TokenTree])
                   -> Box {
    base::check_zero_tts(cx, sp, tts, "line!");

    let topmost = cx.expansion_cause().unwrap_or(sp);

    base::MacEager::expr(cx.expr_u32(topmost, 0))
}

/* column!(): expands to the current column number */
pub fn expand_column(cx: &mut ExtCtxt<'_>, sp: Span, tts: &[tokenstream::TokenTree])
                  -> Box {
    base::check_zero_tts(cx, sp, tts, "column!");

    let topmost = cx.expansion_cause().unwrap_or(sp);
    let loc = cx.source_map().lookup_char_pos(topmost.lo());

    base::MacEager::expr(cx.expr_u32(topmost, loc.col.to_usize() as u32 + 1))
}

// becomes

/* column!(): expands to the current column number */
pub fn expand_column(cx: &mut ExtCtxt<'_>, sp: Span, tts: &[tokenstream::TokenTree])
                  -> Box {
    base::check_zero_tts(cx, sp, tts, "column!");

    let topmost = cx.expansion_cause().unwrap_or(sp);

    base::MacEager::expr(cx.expr_u32(topmost, 0))
}

/// file!(): expands to the current filename */
/// The source_file (`loc.file`) contains a bunch more information we could spit
/// out if we wanted.
pub fn expand_file(cx: &mut ExtCtxt<'_>, sp: Span, tts: &[tokenstream::TokenTree])
                   -> Box {
    base::check_zero_tts(cx, sp, tts, "file!");

    let topmost = cx.expansion_cause().unwrap_or(sp);
    let loc = cx.source_map().lookup_char_pos(topmost.lo());
    base::MacEager::expr(cx.expr_str(topmost, Symbol::intern(&loc.file.name.to_string())))
}

// becomes

/// file!(): expands to the current filename */
/// The source_file (`loc.file`) contains a bunch more information we could spit
/// out if we wanted.
pub fn expand_file(cx: &mut ExtCtxt<'_>, sp: Span, tts: &[tokenstream::TokenTree])
                   -> Box {
    base::check_zero_tts(cx, sp, tts, "file!");

    let topmost = cx.expansion_cause().unwrap_or(sp);

    base::MacEager::expr(cx.expr_str(topmost, Symbol::intern("")))
}
After these changes we can open the Visual Studio command prompt and compile by entering:
python.exe x.py build The compile process will take a while. If you have many cores, you can try to speed it up by changing relevant parts in the config.toml file. It can also happen that the build ends with some strange error. This may happen if you’re compiling for 32-bit and LLVM exhausts memory. The documentation mentions this. It’s not a big issue, just relaunch the build command and the build process will continue from where it left off. It never happened to me that I had to rebuild more than once.
If the build ends successfully, you should end up with a rustc compiler in build/i686-pc-windows-msvc/stage2/bin. I didn’t find any cargo.exe in that directory, so I just copied the one from the official installation into it.
I then prepared a batch file to launch the Visual Studio command prompt for the correct Rust version:
SET PATH=%PATH%;C:\[...]\rustc-1.35.0-src\build\i686-pc-windows-msvc\stage2\bin
%comspec% /k "C:\Program Files (x86)\Microsoft Visual Studio\2017\Community\VC\Auxiliary\Build\vcvars32.bat"
And compiled the release of the test binary via:
cargo run --release The output now is:
Hello, world!
thread 'main' panicked at 'this is an error', :0:0
error: process didn't exit successfully: `target\release\simple.exe` (exit code: 101)
If we set RUST_BACKTRACE, the result will be the same.
After inspecting the executable we can see that there is still some metadata left in the shape of some absolute paths, such as:
Offset     0  1  2  3  4  5  6  7    8  9  A  B  C  D  E  F     Ascii

0001BE40  4C 6F 63 6B 53 68 61 72   65 64 00 00 30 10 40 00     LockShared..0.@.
0001BE50  04 00 00 00 04 00 00 00   C0 93 40 00 70 92 40 00     ..........@.p.@.
0001BE60  70 93 40 00 00 00 00 00   00 00 00 00 00 00 00 00     p.@.............
0001BE70  43 3A 5C 55 73 65 72 73   5C 63 5C 72 75 73 74 5F     C:\Users\c\rust_
0001BE80  62 75 69 6C 64 73 5C 72   75 73 74 63 2D 31 2E 33     builds\rustc-1.3
0001BE90  35 2E 30 2D 73 72 63 5C   73 72 63 5C 6C 69 62 63     5.0-src\src\libc
0001BEA0  6F 72 65 5C 66 6D 74 5C   6D 6F 64 2E 72 73 00 00     ore\fmt\mod.rs..
0001BEB0  70 CE 41 00 3E 00 00 00   63 01 00 00 13 00 00 00     p.A.>...c.......
0001BEC0  C0 CE 41 00 00 00 00 00   00 00 00 00 00 00 00 00     ..A.............
0001BED0  3A 20 00 00 C0 CE 41 00   00 00 00 00 D0 CE 41 00     :.....A.......A.
All the paths I could find were related to the path of the compiler and not that of the project. If you’re bothered by them, it’s easy to write a simple Python script to zero them out as a post-build step.
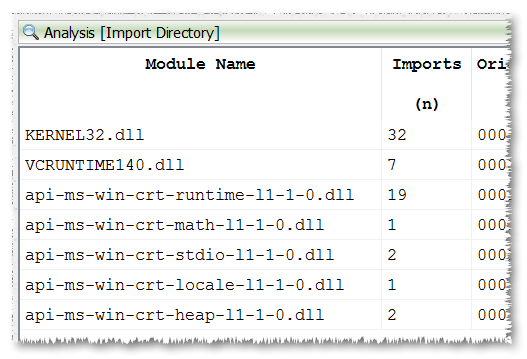
Now we could be ready, save for the fact that the libc wasn’t linked statically into our executable. If we take a look at the import table, we can see the ugly imports produced by newer versions of Visual Studio.
To solve this we need to invoke rustc like this:
rustc -C target-feature=+crt-static ... I found the relevant documentation for this here. But we want to specify this flag for cargo. We can achieve this by setting the environment variable RUSTFLAGS:
RUSTFLAGS='-C target-feature=+crt-static' So I modified my batch script like so:
SET RUSTFLAGS=-C target-feature=+crt-static
SET PATH=%PATH%;C:\[...]\rustc-1.35.0-src\build\i686-pc-windows-msvc\stage2\bin
%comspec% /k "C:\Program Files (x86)\Microsoft Visual Studio\2017\Community\VC\Auxiliary\Build\vcvars32.bat"
Now after the build process, we end up with a bigger executable and no external dependencies apart from kernel32. Perfect!
At this point we only have to strip the debug directory from the PE. We can do this by using a simple script for Cerbero Suite or CFF Explorer. To be honest for my programs I still use a CFF Explorer script and never bothered writing one for Cerbero.
function fixdbg(name)
    local h = OpenFile(dir .. "\\" .. name)
    if h == null then
        MsgBox("fail")
        return
    end
    RemoveDebugDirectory(h)
    UpdateChecksum(h)
    SaveFile(h)
    -- don't close, otherwise it fails, don't know why
end

dir = GetCurrentDirectory()

-- list of files to fix
fixdbg("app.exe")
You can call this script fixdbg.cff and launch it directly as the cff extension is associated to CFF Explorer. This can be arranged as a post-build step.
Let’s finish this nicely by maximizing compatibility. Now that we have a clean, statically-linked executable, we can try to make it run on XP. We just need to modify some fields in the Optional Header of the Portable Executable.

We modify these fields as follows:
MajorOperatingSystemVersion: 5
MinorOperatingSystemVersion: 0
MajorSubsystemVersion: 5
MinorSubsystemVersion: 0
And now it’s time to try…
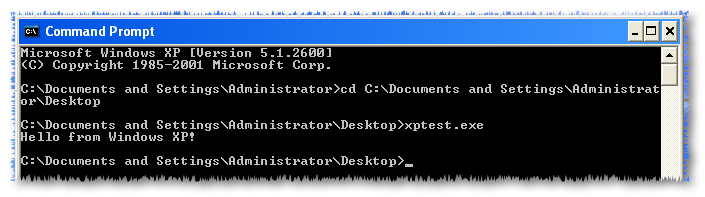
We have a stripped Rust executable built with the latest stable Rust compiler and Visual Studio 2017 running on Windows XP!